Rainfall
A downloadable experiment for Windows, macOS, and Linux
Rainfall is a simple audiovisual experiment.
There were two main things I wanted to play with here
- Shaders
- Audio
More on each below. The source code and assets are all available here:
https://github.com/kwoodhouse93/rainfall
On WebGL: I discovered too late that the way Unity builds for WebGL only supports a very limited set of audio features. The audio filters I used here do not work in WebGL builds, so unfortunately there is no way to run this in the browser without putting in more work than I'm willing to at this point.
Shaders
Intro to Shaders
Before this project, I had no idea what shaders really were. I assumed some kind of magical incantation was involved. Then a friend pointed me to this excellent resource on 3D shaders: https://lettier.github.io/3d-game-shaders-for-beginners/index.html
So I decided to have a play with them. But that resource is written with GLSL and Unity prefers you to write HLSL. That meant I had to actually understand what the code was doing in order to implement it in Unity. Another part of the challenge was just understanding how to get custom shaders to work in Unity.
It turns out there are different types of shader - the ones most people are more familiar with are the shaders used to render a 3D object to the 2D image that we see on our screens. I won't go into it here, but the video below is an excellent intro to shaders, including a look at how they work in Unity. It's long, but well worth a watch.
Pixelisation
I implemented a pixelisation shader. It didn't make the final cut, but it was part of my process, so I'll mention it anyway.
This kind of shader is an image effect shader. It runs after the scene is mostly rendered. Its input is just a simple quad mesh which already has the camera view rendered on it. This allows us to apply post-processing effects like overlaying an image or distorting the image.
You can find it in the Assets/Rendering/UnusedForwardRenderer/PixelateShader directory.
It works great for 2D and 3D. It needs to use the default forward renderer because it hooks into 'Renderer Features', which you can use with the Universal Render Pipeline (URP).
And, it turns out that this is a severe limitation when it comes to 2D games using the experimental 2D renderer. If you want to make a 2D game using URP's 2D lighting features, there is no way to make use of a custom image effect shader. At least that I could find. If you know of one, please let me know in the comments!
In the end, I decided 2D lights would improve this project more than a pixelisation filter, so I moved over to the 2D renderer and abandoned the pixelisation shader.
A note on 2D: in the screenshot above, you can see some semi-transparent looking pixels surrounding objects. This happens when the sample point for a pixel lines up with some anti-aliasing that was applied in the input image. If you want super crisp pixel art, make sure to set all your textures to use point filtering rather than bilinear or trilinear. This should help remove any anti-aliasing that Unity is adding, so samples will be all or nothing.
2D Water Shader
The other use I had for shaders in this project was for the water.
Luckily, the 2D renderer does still support shader graph. That means we can create a shader graph, create a material to use the generated shader, and apply that to a sprite renderer.
There are a few cool ideas floating around the internet about shading water. It's a complex topic with a lot of approaches, but I just wanted a simple wavy 2D water effect. You could animate something like that with sprite sheets or the 2D Animation package, but that sounded like too much work to me, so let's get the computer to do it for us.
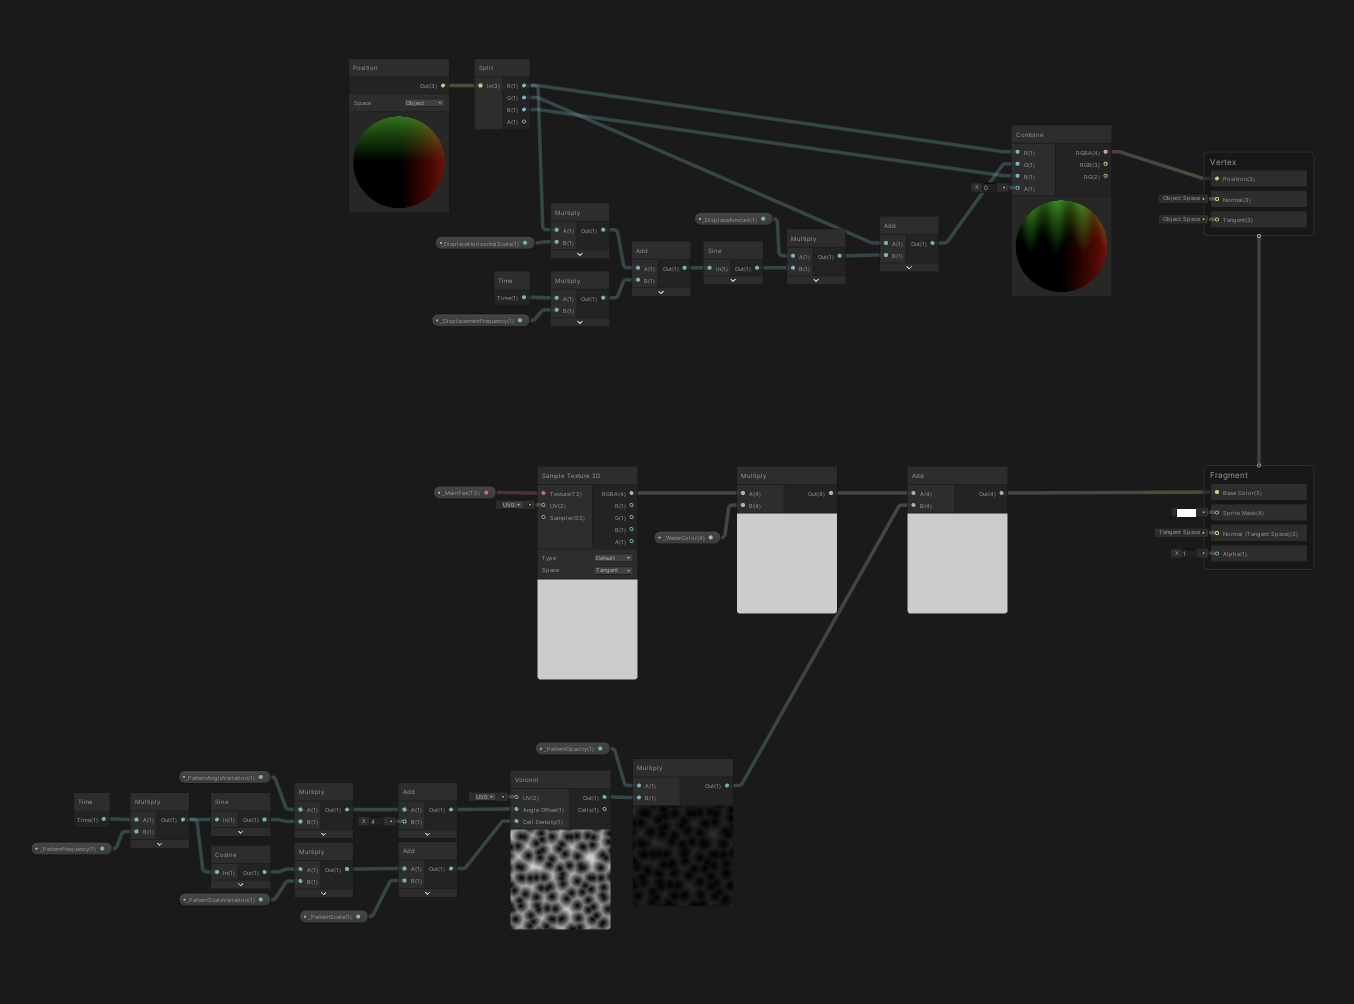
Check out Assets/Objects/Water/WaterSprite.shadergraph in Unity to see the complete shader graph, but I'll break it down a little here. There are 2 things going on:
- Distorting the vertices of the sprite to create a moving wave shape
- Overlay some Voronoi noise to add a bit of texture to the otherwise flat coloured sprite
Vertex Distortion
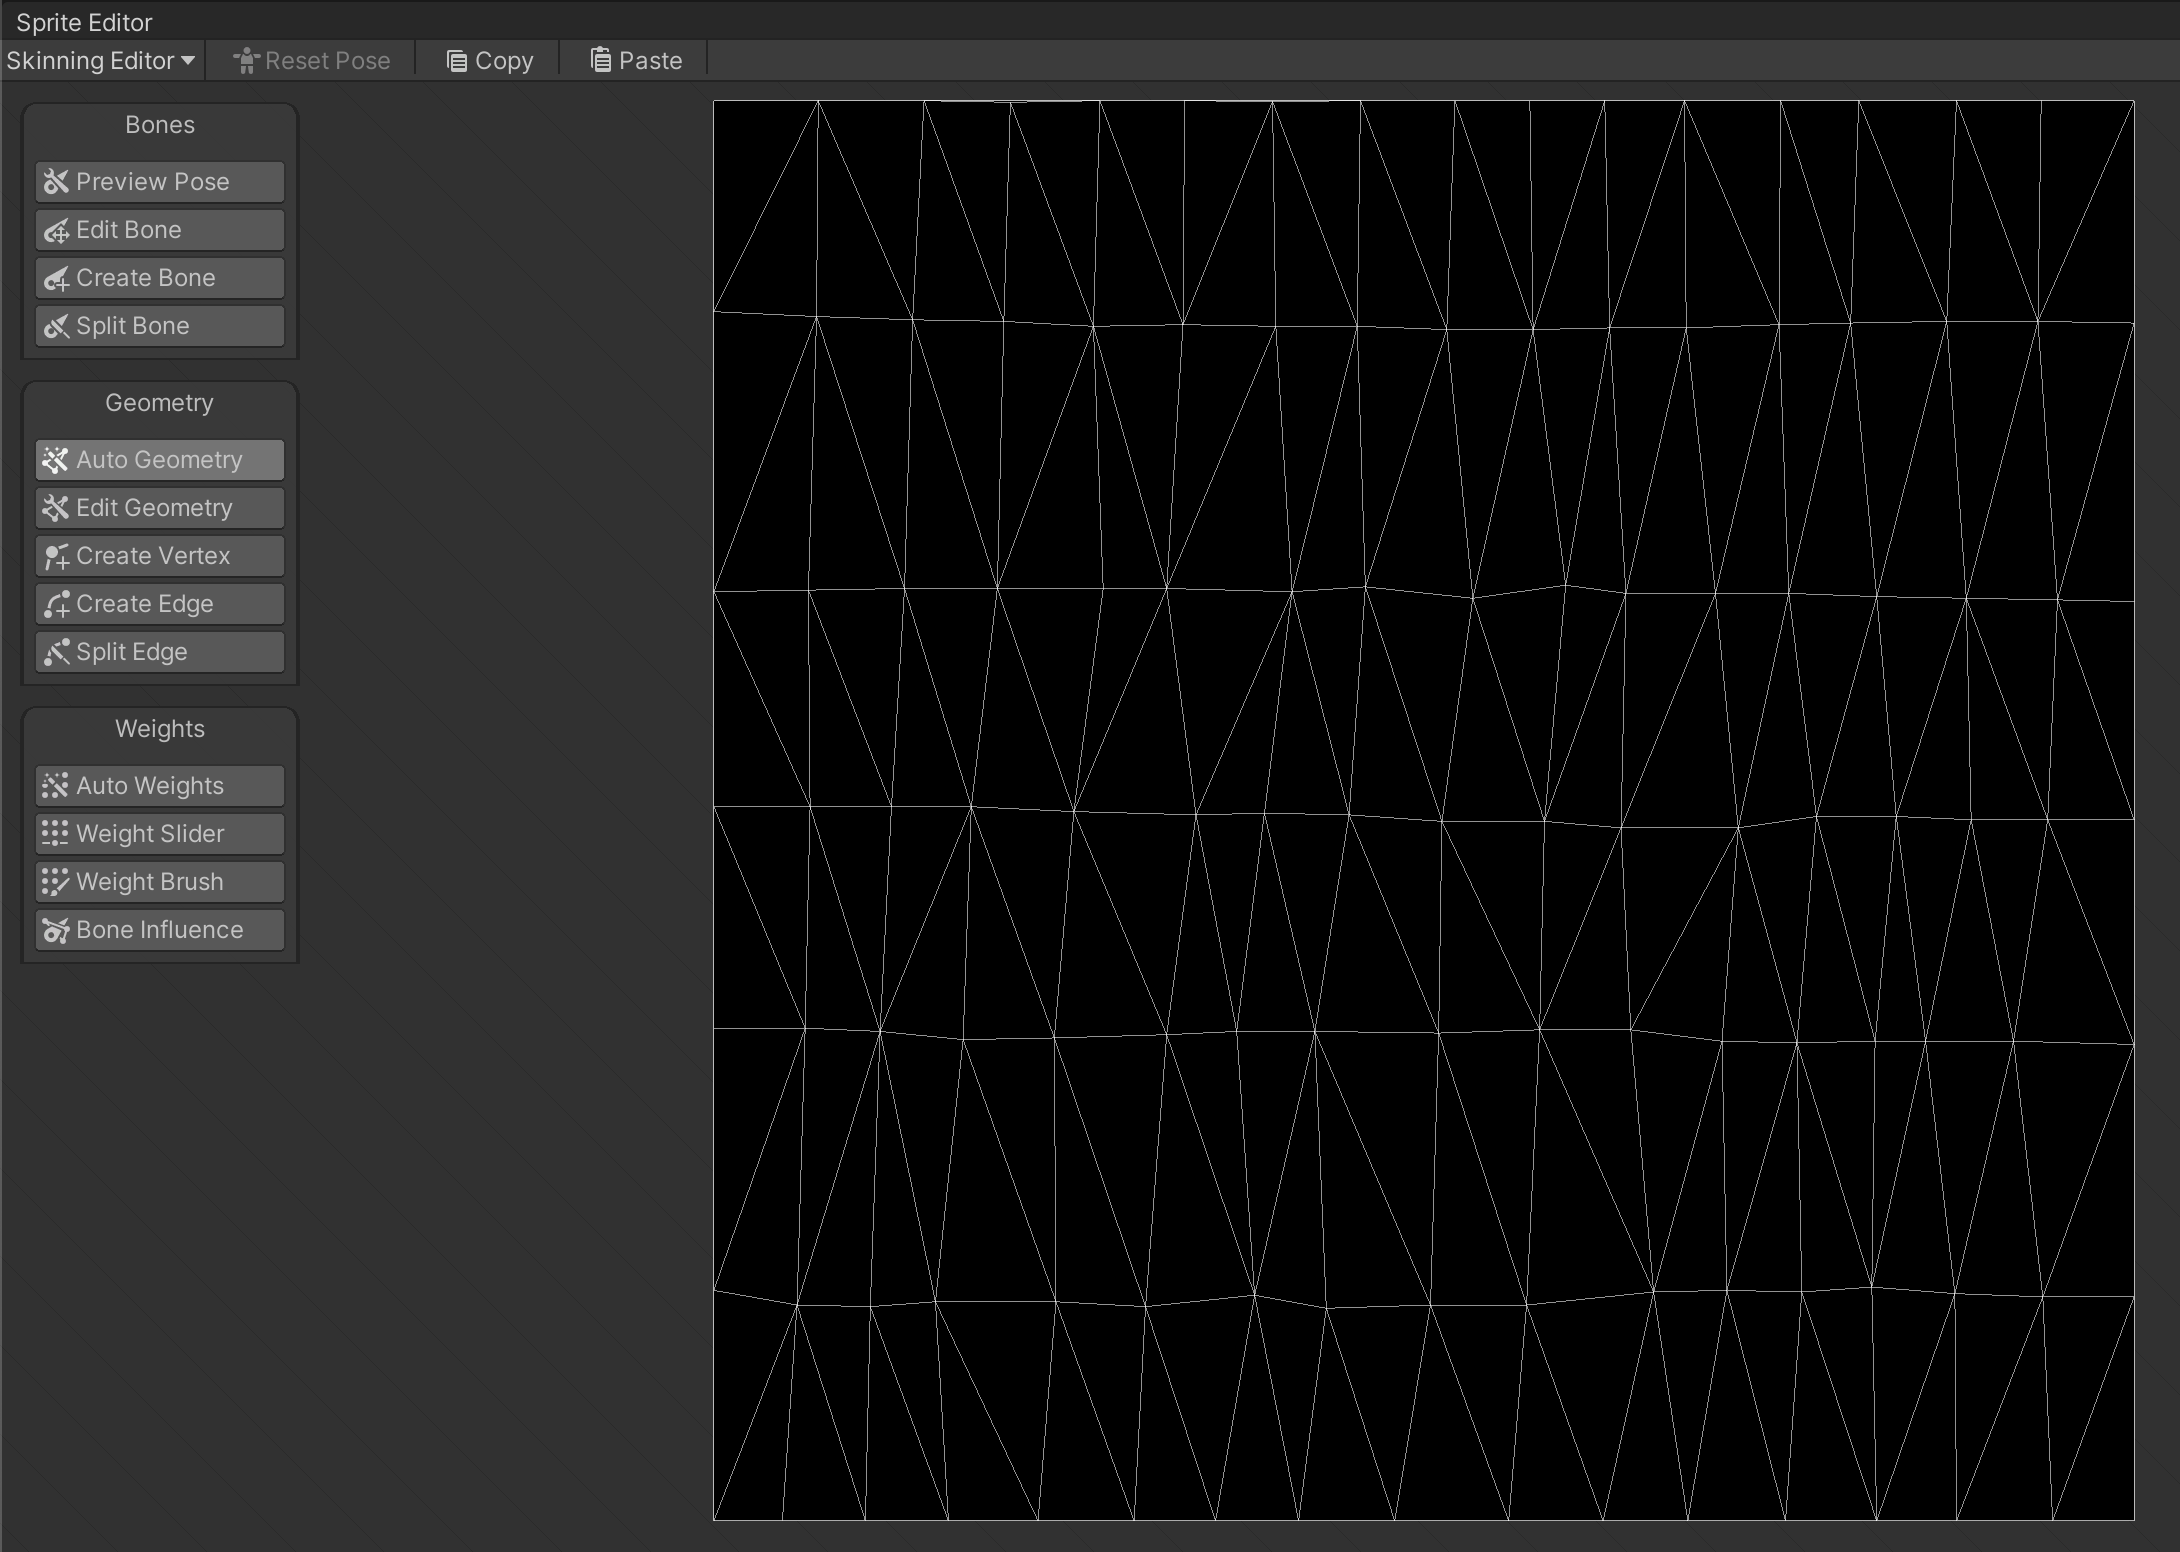
Those of you familiar with 2D in Unity might recognise a problem with trying to change the shape of a Sprite by moving its vertices.
By default, a rectangular Sprite only has 4 vertices - one in each corner. So if we move them around, we'll just get a distorted quadrilateral. To change the shape of the texture, we need more vertices.
Luckily, the 2D Animation package can be repurposed here. It comes with a Skinning Editor tool (you'll find it in the Sprite Editor). This allows us to create custom geometry on a 2D sprite. I used it to add a grid of about 17 vertices per row and about 7 rows down the sprite (pretty arbitrary numbers - more vertices means a smoother effect). Now, if we were to move vertices around in the shader, we would actually change the shape of our sprite!
So how do we actually move vertices? If you watched the video above on shader basics, you'll know a shader typically has 2 parts - a vertex shader and a fragment shader. In the vertex shader, we have access to the object's geometry, and can change the position of any vertex.
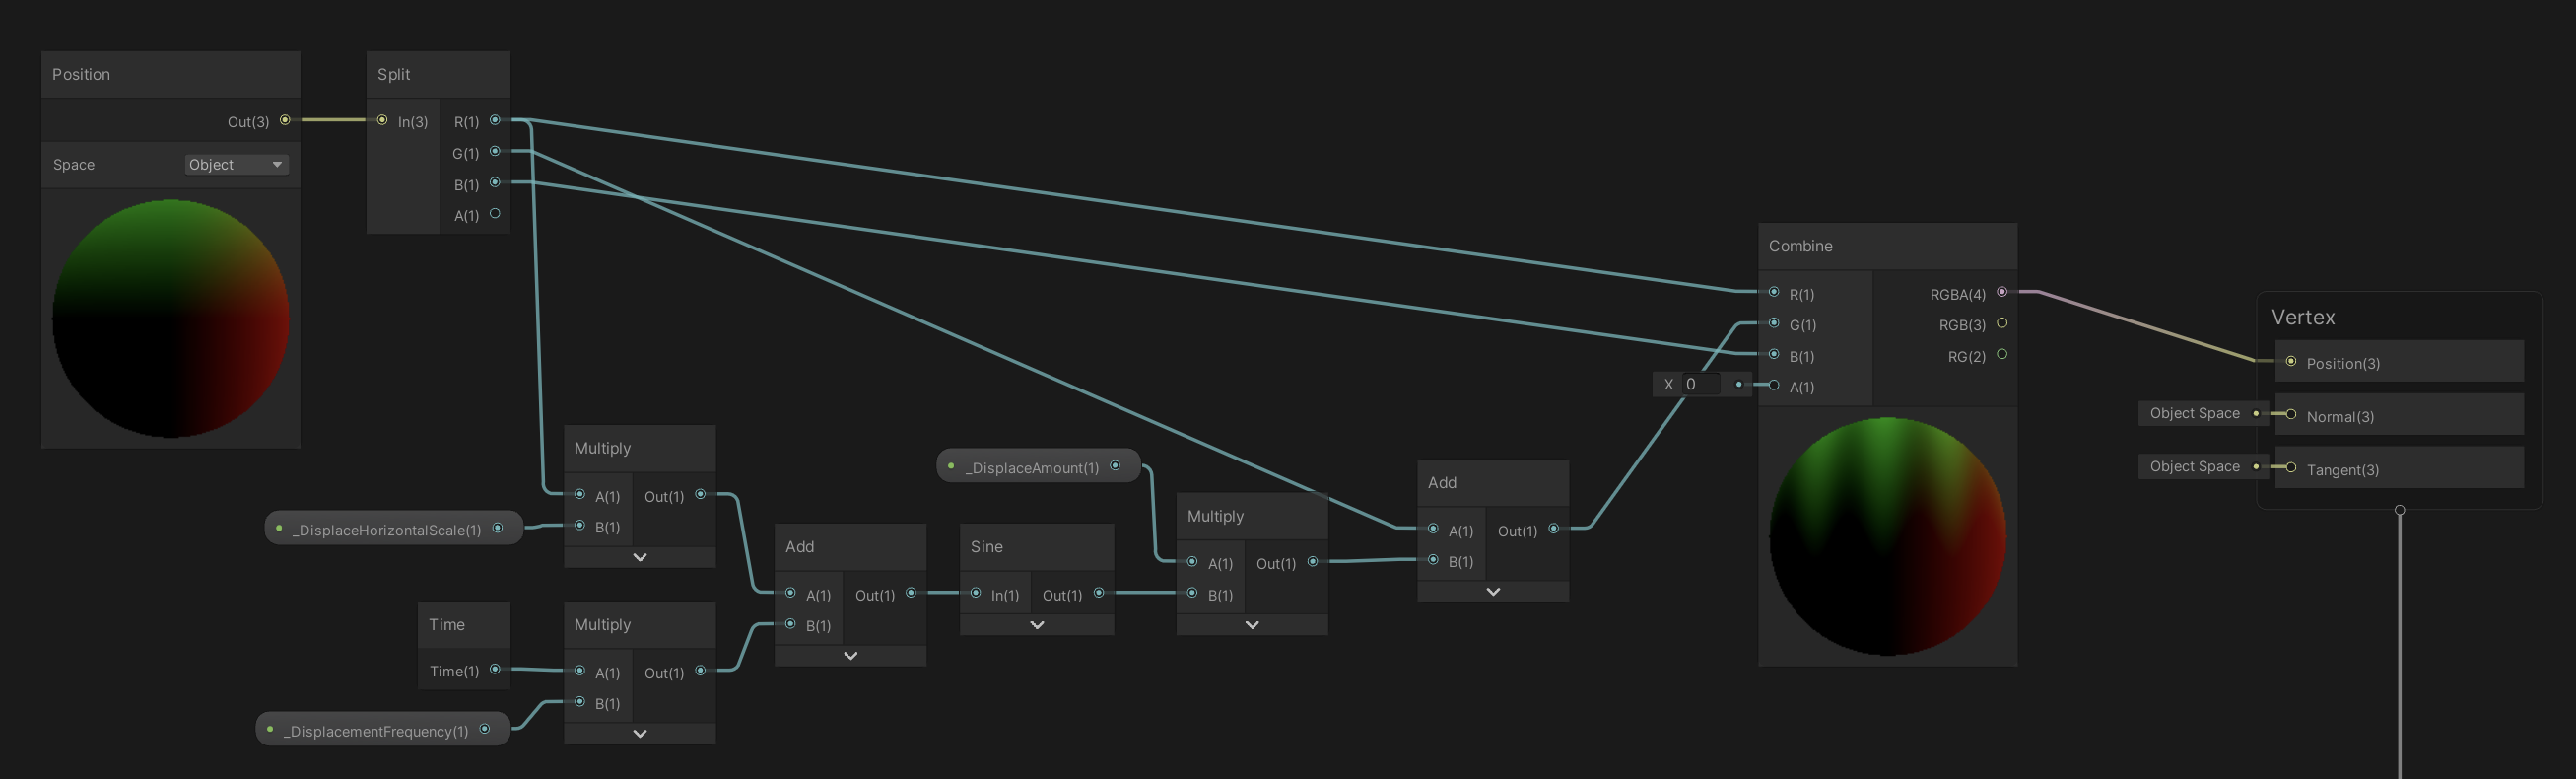
In shader graph, we can generate a sine wave based on the current time and the vertex's x position, then add this to the y position of each vertex. This renders our sprite with a sinusoidal shape as you move along the x-axis, and the whole pattern shifts over time. Neat!
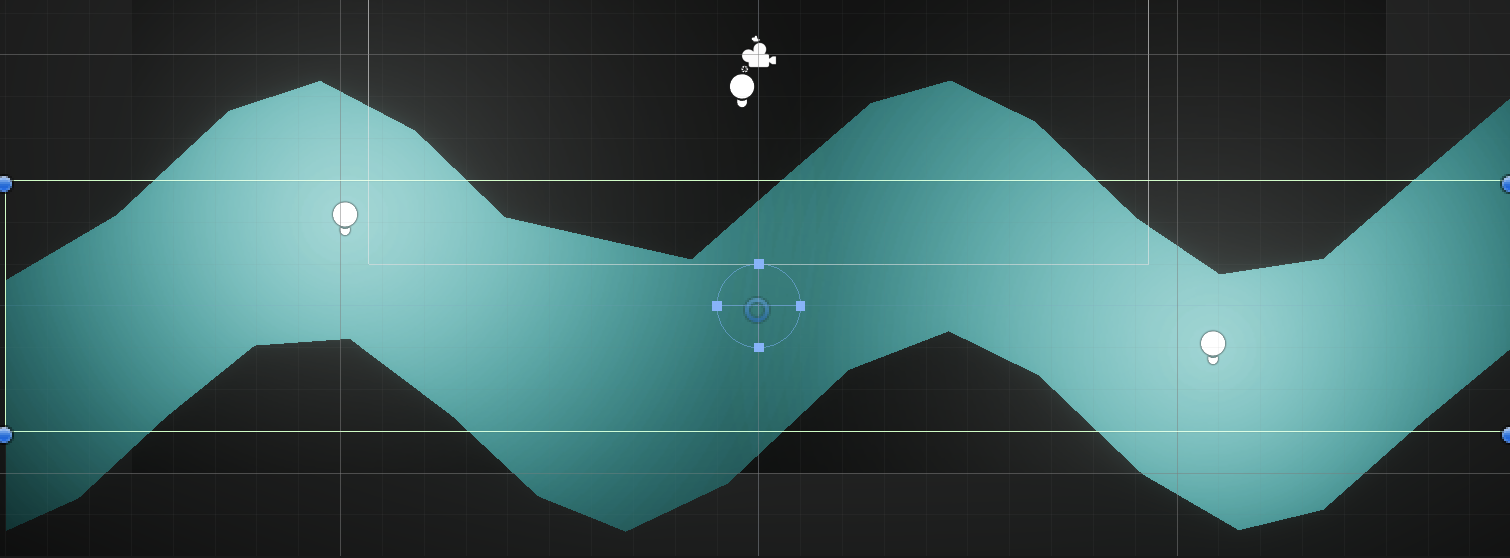
We can go pretty wild with it. This screenshot from the scene view highlights an interesting point too - as far as Unity is concerned, this is still a rectangular sprite. It's only in rendering on the GPU that we get this wavy shape.
Voronoi Overlay
The next part is more artistic - we want to give our flat-coloured sprite more texture. Shader graph has a node for generating Voronoi noise. Lucky for us, this already looks quite wavy if you just fiddle with the input parameters a bit.

To make it less static, I passed the current time into Sine/Cosine nodes to create some sinusoidal waves. These then plug into the parameters on the Voronoi noise node to change it over time.
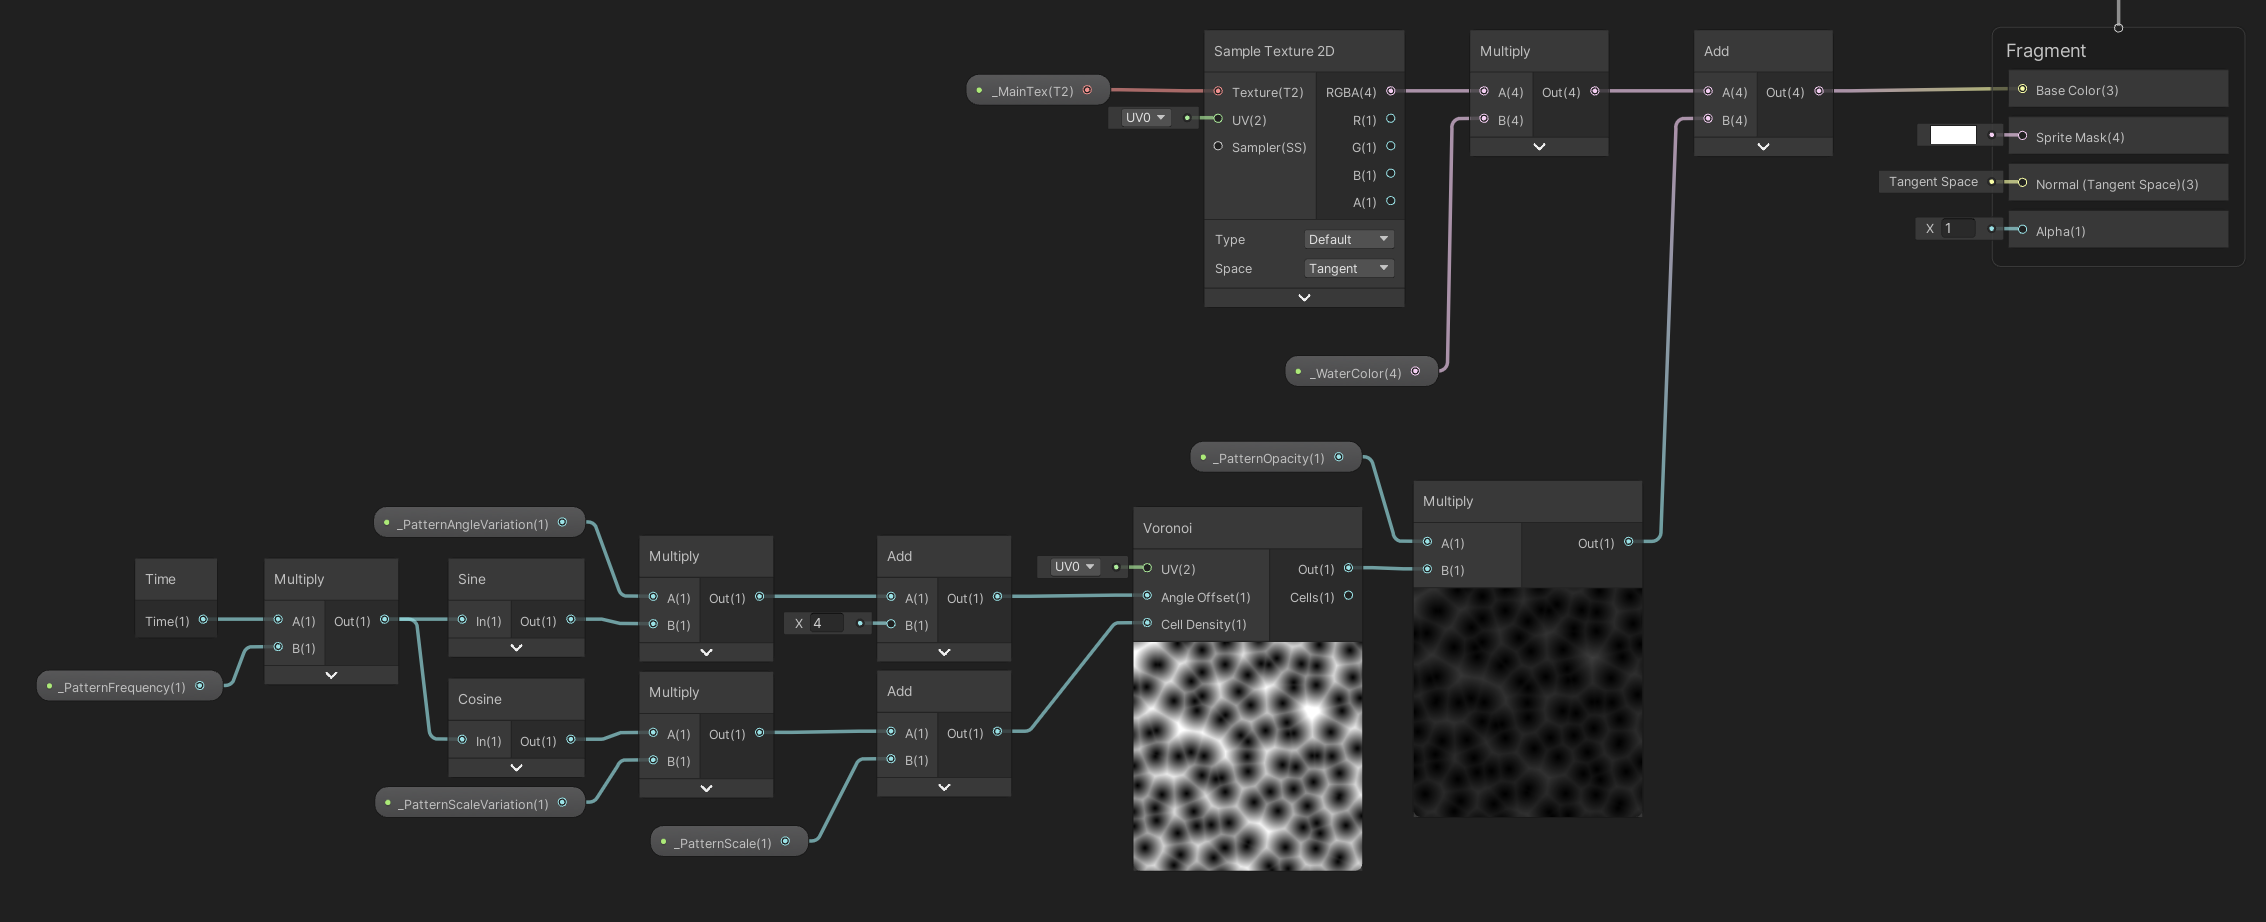
Finally, the noise pattern can be added to the colour being sampled from the _MainTex texture and the pattern appears on top of whatever texture we already had!
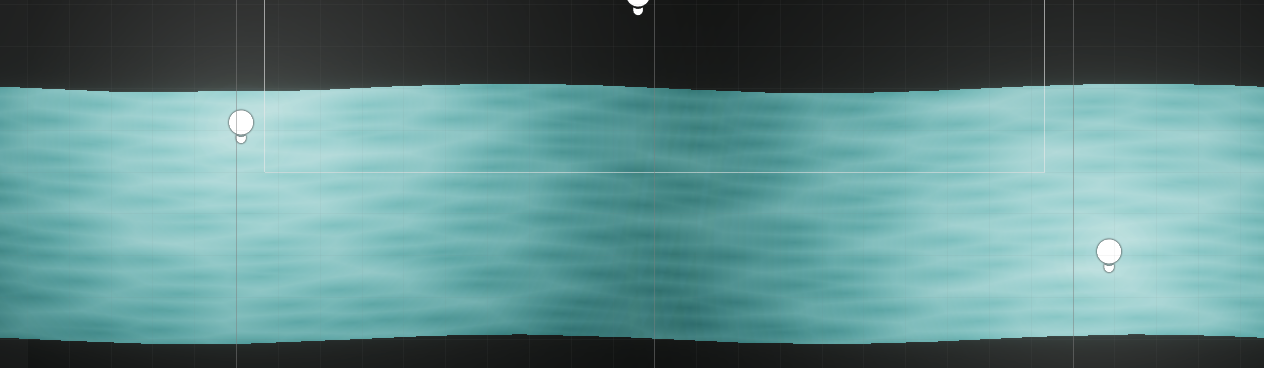
Again, this renders in the scene view.
So...
That was quite a lot of work to produce a really simple effect. But it only really scratches at the surface of what we can do with shaders.
It's worth remembering that shaders run on the GPU. Some tasks (like moving vertices on every frame) can be more efficient to run on the GPU. Another cool advantage is you actually get to see your shader rendered in the scene view in Unity.
On the other hand, you can't, for example, use the distorted mesh that your shader produces in other code that runs on the CPU, like physics updates.
You really do have to think about what you're trying to achieve before deciding whether to use animations or scripts to implement visual effects, or write a shader for it.
Audio
There are 3 sounds in this experiment:
- Raindrops
- Ocean waves
- Background noise
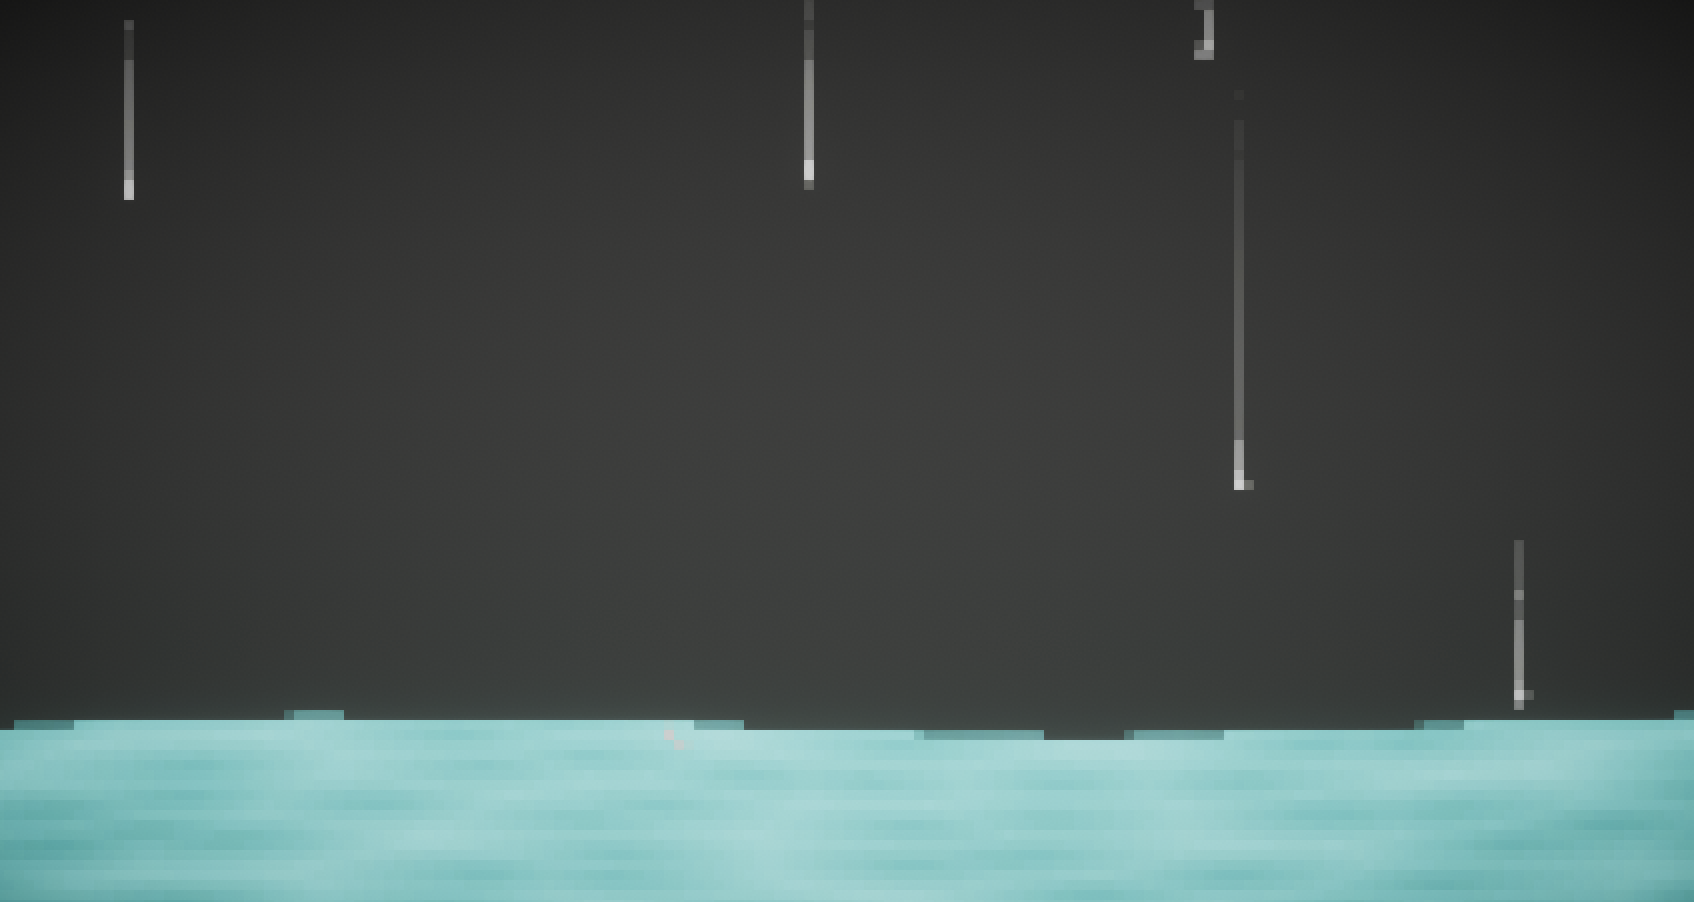
Raindrops
These are really the core of the experiment and the idea for them is why I even started on this. It works quite simply: when a raindrop enters a trigger (the water), we call an audio manager to play a sound.
That audio manager picks a random audio clip (actually, it delegates this to a SoundCollection ScriptableObject) from a set of samples taken from the Classic Electric Piano in Garageband. The pitches of these samples were chosen from a pentatonic scale to avoid any bum notes. See them here.
The AudioSource also gets a reverb filter to help it feel a bit more spacious. The overall effect is basically a glorified, digital wind chime.
There's actually loads more to explore here. Picking random pitches from a pentatonic scale can only ever be so nice. There are some much more interesting algorithms for picking a sequence of notes that could be explored.
For example, you could factor timing into how you pick notes. Two notes sounding at more or less the same time could select notes from a chord. Notes further apart could choose notes from different chords, forming an overarching progression.
Another idea might be to explore arpeggios and scales. There are loads of patterns that synth arpeggiators can use to select notes, for example.
It might even be fun to throw the rulebook out the window and come up with something wildly dissonant.
Ocean Waves
This is where the most interesting scripting happens. Check out Assets/Objects/Water/SeaNoise.cs for details. The input audio clip is just 3 seconds of white noise, with a little reverb applied in Audacity, and with a 1 second Fade In and Fade Out effect applied too.
On its own, that sounds a little static and artificial. So I added some movement to it.
The first thing we do is modulate the pitch on the AudioSource. We just add a small sinusoidal wave to it to reduce the effect of all the waves sounding exactly the same.
Next, we actually have a low pass filter applied to the AudioSource, and modulate the cutoff in time with the duration of the AudioClip. As the wave audio clip starts playing, the cutoff is at its lowest. It ramps up as the clip reaches its peak volume - the filter becoming more open. Then it rolls off as the clip comes to an end. Again, this brings a bit more movement to it.
Finally, we also adjust the volume, reducing it towards the end of the clip by different amounts each time. Despite it being a simple concept, there's a fair bit of maths involved to get this working. Check out the source code - it should be fairly well commented.
Background Noise
The final piece in the puzzle is the background noise. This is just a generated Brownian noise played at a low volume to bring everything together.
Conclusion
Quite a lot to unpack there... There's a bit more going on in the project too, like how the raindrops are spawned and destroyed. It's mostly basic Unity. You're encouraged to poke around the source code, and I'll be happy to answer any questions in the comments.
Here's to the next experiment!
Download
Click download now to get access to the following files:

Comments
Log in with itch.io to leave a comment.
Nice